Thursday, 20 June 2024
Timecodes to be marked as conventions in my Final Edit
CREDITS:
At 3:43 to 4:18, there are credits shown at the end of the short film
SOUND:
-0:00 to 0:45
-1:11 to 1:14
-1:46 to 3:00
-3:01 to 3:17
-3:13 to 3:43
COSTUMES & PROPS:
-1:18, 1:20
-1:30
-1:55
-2:01
-2:31
-2:55
-3:05, 3:07, 3:13
LOCATION:
-0:20
-0:50
-1:01
-1:09
Tuesday, 18 June 2024
Post-Production Tools
When editing my first and final edit, a tool I mainly used was the blade tool. I used the shortcut key (command + B) to make my editing more quick and efficient. I used this tool for cutting up videos to shorten them so I can have flawless transitions, while also using the tool for audio files to help cut up any unwanted noise that creeped into the recordings.
Here is an example:
Another technique I used were the effects presets. I used the "gaussian blur", "letterbox", "Prism" effects and more, to make the film more cinematic, and emphasise certain scenes like the hallucinating scene. I dragged the effects to the desired clip and adjusted the settings to make it effective and fit my short film.
On the top right corner, you can see an example:
A technique I carried out when editing the sound in my short film was cutting the original version of the non-diegetic soundtrack and fading it into the instrumental, to smooth over into the cinematic aspect of the film. By doing this I also lowered the volume of the instrumental so it doesn't overpower the dialogue.
Here is an example:
An editing tool I used when editing my short film was that I did colour correction on every clip used. This was so I can fix any underexposed clips, and adjust the look to keep the audience engaged and satisfied with the look of the shots. I did this by enabling colour adjustments and changed the amount of exposure, contrast, brightness, highlights, saturation, shadows, and midtones, all so the quality is higher.
Here is the before and after colour correcting:
BEFORE:
AFTER:
Finally, a tool I used to control the sounds in different clips was the volume adjuster. I used the fade in/out slider in the audio adjuster of clips, and even muted some, so that unwanted noise wouldn't come through carelessly.
Here is an example:
Changes I had to make to my storyboard during production
When filming my short film I had to make changes to my storyboard to be able to capture the best quality shots.
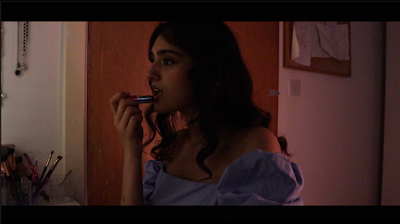
In one of the shots where Belle looks at the door for a second then puts her lipstick on after, I was originally going to have the camera shot from the back and the n cuts to the side. However I quickly realised that the angle wasn't that appealing for her side and back profile, and didn't properly capture the room door, so I opted to angle the camera a bit more front-faced, but still on the side, which opened up Belle's space more and overall looked much better that the original idea. It also added more variety into the camera movement.
Here is the original plan:
Export Format
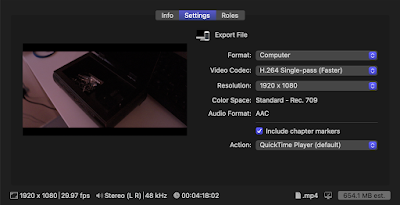
When I finally finished editing my final edit, I looked at the specification to see what format the film must be exported in (H.264 and MP4). The format I chose was computer. This is so the film can export in a .MP4 file. I chose H.264 as the video codec, as the specification recommended. The resolution I chose for the short film was 1080p, as I filmed in that resolution, so exporting in 4k wouldn't have made a difference, and would've taken unnecessary space.
Monday, 17 June 2024
Questions to ask my Focus Group
Before moving forward to film my focus group for my final edit, I came up with questions to lead the focus group into giving me the type of feedback I need:
- Is the narrative clear and understandable?
- Are there any changes I could make, editing-wise?
- Did the actors perform their role well?
- Is my short film good enough to be adapted into a longer film?
- Are there any dislikes for my short film?
- Any improvements on the sound editing?
- Would the audience like the camera shots/techniques?
- Was the dialogue in the film clear?
- Any weaknesses in the film?
- Any additional feedback?
Sunday, 16 June 2024
Saturday, 15 June 2024
Thursday, 13 June 2024
Wednesday, 12 June 2024
Feedback for the First Edit
I showed my teacher my first edit in order to collect feedback on how I could improve the short film and this is what she has advised me to do:
- Cut the end of the first clip as it moves
- Fade from black in the first clip
- Cut the two lipstick shots to put between as she’s putting lipstick away then switches
- Cut away wobbliness
- Add in shot of putting hand on shoulder
- Cut off audio of background noise, add in foley sound
- Add in zoom effect on still images (more controlled use of camera)
- Edit in youtube channel to show what they’re actually filming for
- Emphasise laughing with sound, more layers
- Duplicate laugh, make more chopped
- Blur knife scene to blend with laughing
- Fix the lighting in clips
- Add in voiceover
- Add in credits at the end or beginning
Production Setup Reflection
Here in these images below I. am looking at the room setup and visualising where props will be placed, where lighting will be suited, and where the camera should be.
Here in the images attached, I am checking the risk assessment, making sure that the area is safe and there are no obstacles in the way, especially for the camera, as I need to make sure I am able to capture all kinds of angles.
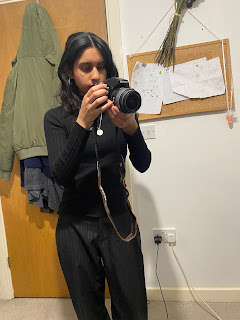
Here are images of me reviewing the script so I can remind the actors on what they need to say and how they should say it. While also looking at the camera directions an directions the actors must do.








.png)